
Plumbing diagrams look like a foreign language until you realize they’re mostly a color-coded map: where water comes in, where waste goes out, and where the toilet, sink, and shower sit between those two points.
You don’t need a plumber’s license to read one. You need to know a handful of symbols, which lines matter for your project, and what to check before you cut into a wall. From watching guys in renovation forums, the ones who get burned aren’t the ones who can’t read plans. They’re the ones who never tried.
Key Takeaways
A plumbing diagram is a map of water in and waste out; read the legend first, then decode the colors — blue cold, red hot, black waste, yellow vent.
For a single-story bathroom reno, a floor plan plus a drainage layout is enough; riser diagrams only earn their keep when pipes run between floors.
Pipe annotations like Ø50 mean a 50mm pipe, but confirm whether the diameter is internal or external — copper is usually measured internally, PVC externally.
Table of Contents
What Is a DIY Plumbing Diagram and Why It Matters
A plumbing plan is a technical drawing that maps the water supply, the drainage, and every fixture in between. Think of it as the roadmap for water: how it gets in, how it gets out. That’s the whole idea.
Professionals live in these drawings. Licensed plumbers, builders, project managers, architects, engineers, local councils, building inspectors — everyone on a job needs to be looking at the same page. But you don’t need to read plans like they do. For a home project, even a simple annotated sketch prevents the expensive stuff: rework, failed inspections, and delays.
Here’s the part that surprises people. A good layout isn’t just about avoiding screw-ups. It saves time when you’re actually running pipe. Rough-in and fit-off go faster when you’re not making it up as you go.
And because you’re not working alone — plumbers have to dodge electricians, carpenters, and HVAC crews, reading the plan helps you spot clashes before they become arguments on site. Walking a client or builder through the plan also builds trust and credibility, showing them you’ve thought through every connection before the first pipe is cut.
Still deciding whether this is a job you want to take on at all? Read can you diy plumbing first.
Types of Plumbing Diagrams for Home Projects
Four types of plans show up in residential work, and you only need to understand two of them for a typical bathroom reno.
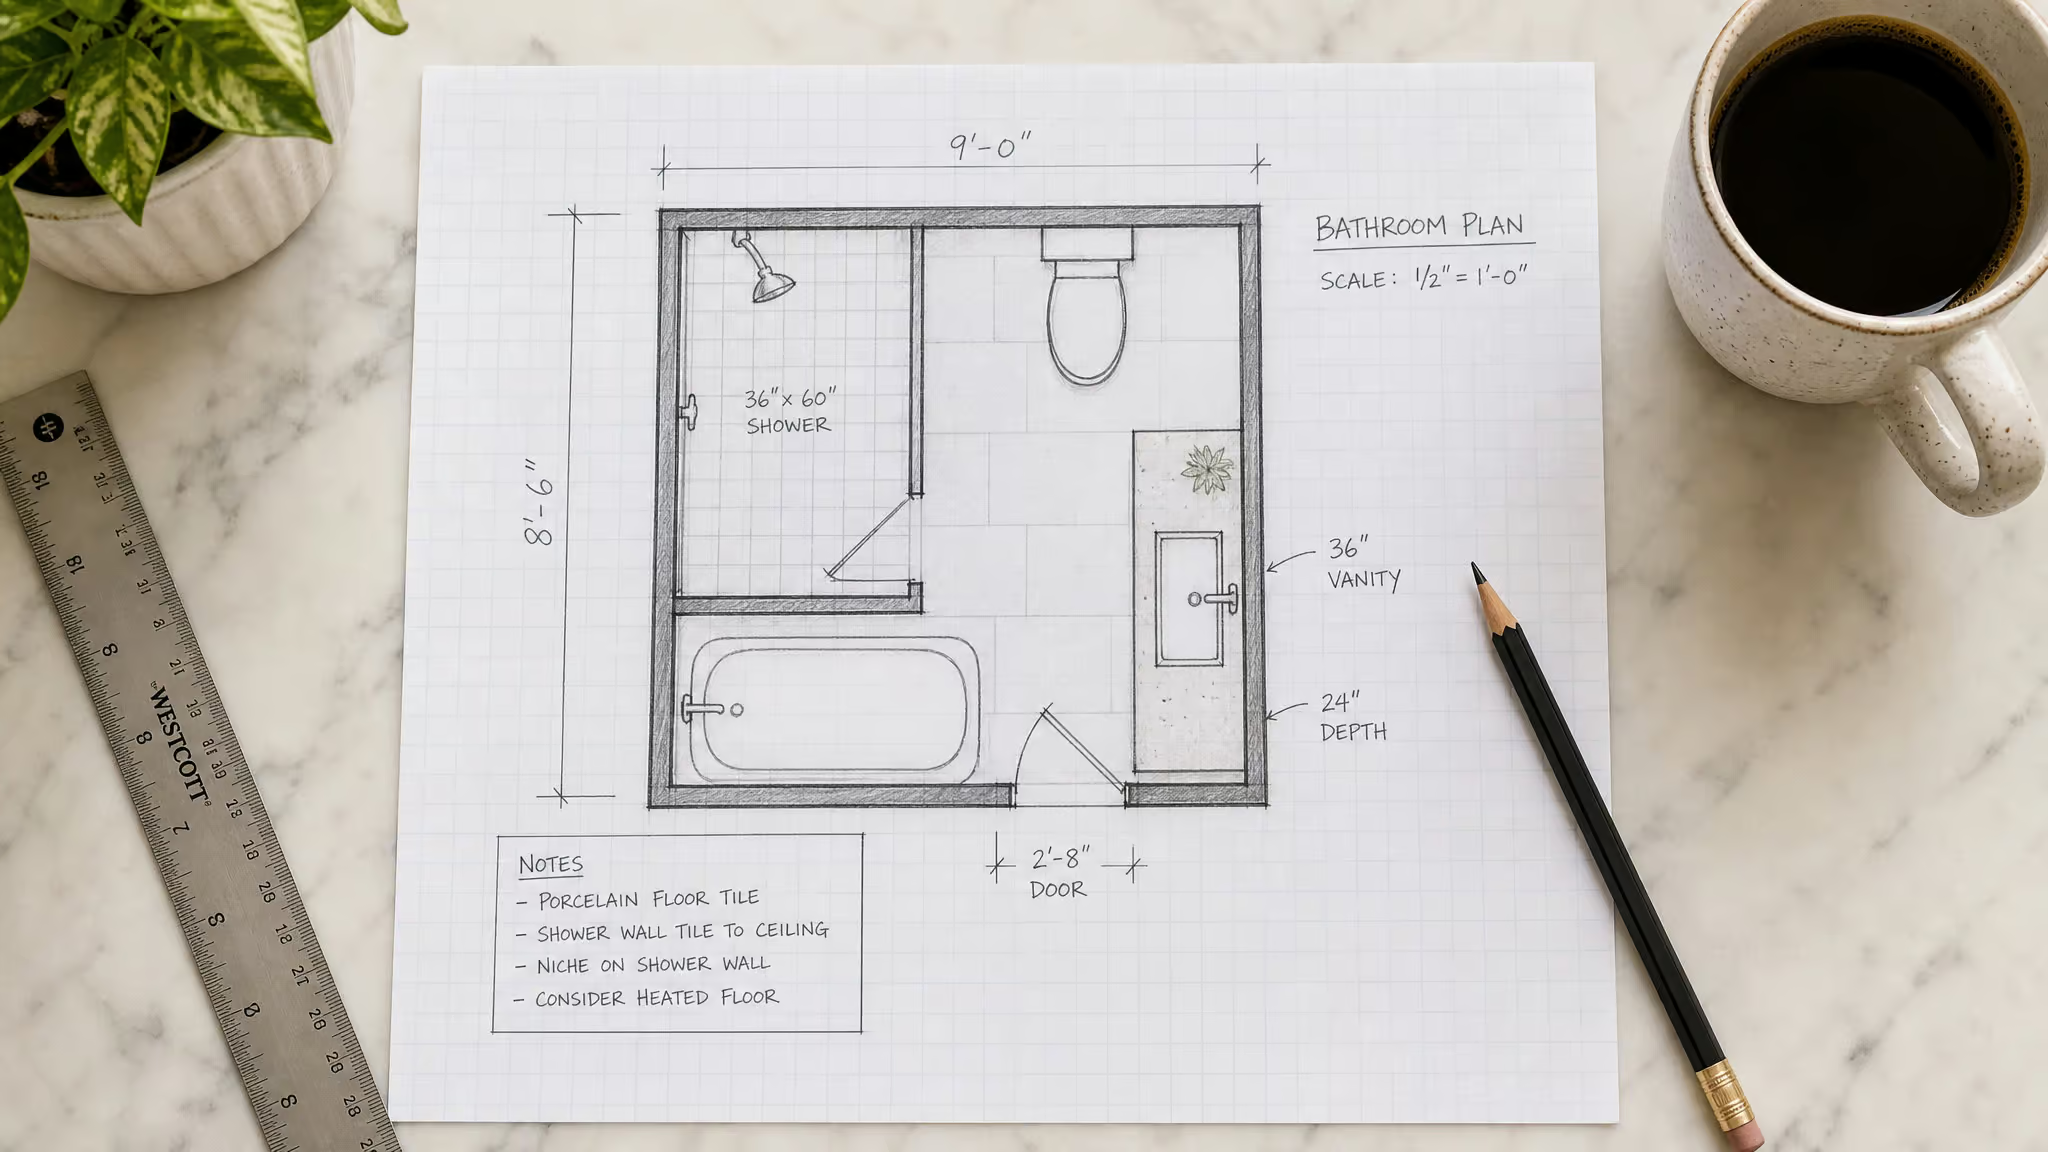
Floor plans
The floor plan is the overhead, bird’s-eye view. Walls, rooms, and where everything sits: toilet, sink, shower, water heater. It’s what most people picture when they hear the word blueprint. If you’re laying out a bathroom, this is your starting point.
Riser diagrams
Riser diagrams show the vertical runs — how water and waste move up and down through a building. In a 3D-ish, isometric view, you can trace the pipe as it travels from the ground floor to the bathroom upstairs.
Essential for multi-story work. Overkill if everything you’re doing happens on one level.
Fixture drawings
These are the close-ups. A fixture drawing zooms in on one specific installation — how that vanity basin connects to its supply lines and waste outlet, for example. Contractors use them for the nitty-gritty. You’ll mainly need one when you’re installing something unfamiliar.
Drainage and sewer layouts
This is where the dirty stuff goes. Drainage plans show how greywater and sewage leave the building and connect to the main sewer or septic system. They include inspection openings, vents, and the direction of slope — everything that keeps waste moving instead of pooling.
The rule is simple. Single-story bathroom: floor plan plus drainage layout. Running pipes between floors: add a riser diagram.
Bottom line: For a one-level bathroom, a floor plan and drainage layout cover you. Only pull a riser diagram if you’re running pipes between floors.
Plumbing Diagram Symbols, Colors, and Pipe Sizes
The symbols are the language of these drawings. Learn the common ones and you can decode almost any residential plan.
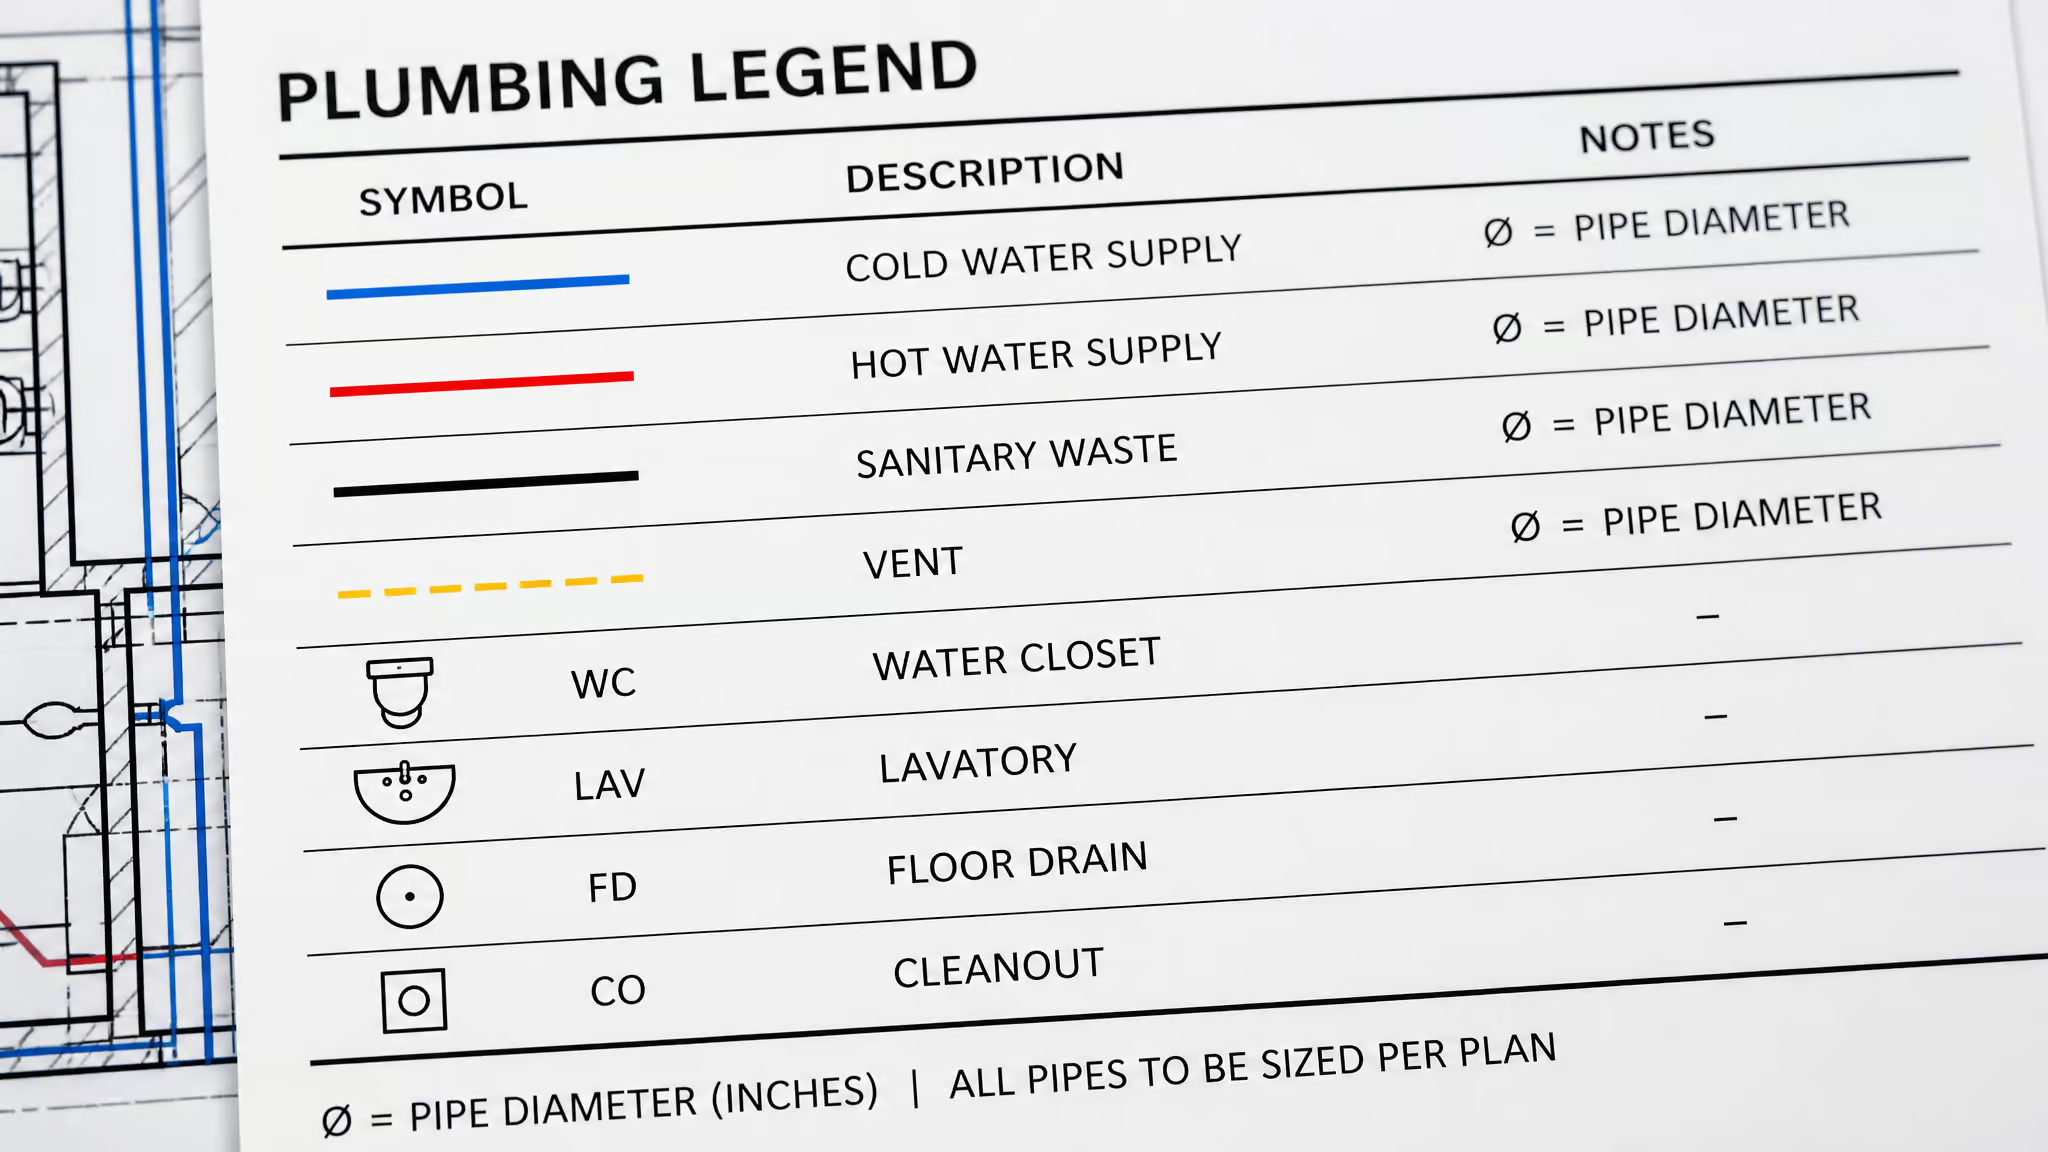
Common symbols
First rule: read the legend before you read the drawing. Always. After that, this cheat sheet covers most of what you’ll see:
- WC — water closet. That’s your toilet.
- Lav — lavatory, meaning the basin or sink.
- S — sink.
- HWS — hot water system, i.e., the water heater.
- V — vent. Lets sewer gases escape and keeps pressure in the system right.
- Ø — pipe diameter.
- ∇ — floor waste.
- Vertical arrows — a riser, showing a pipe running up or down through the building.
Standard symbols exist so everyone stays on the same page. Don’t make up your own.
Color coding
Most residential diagrams color the lines: blue for cold water, red for hot, black for waste, yellow for venting. Once you know that, a messy drawing becomes readable at a glance. Line types matter too — dashed versus solid tells you whether a line is supply, return, or something else, so check the legend even when the colors seem obvious.
Pipe size notation
Pipe sizes appear right on the line. You’ll see something like Ø50, which means a 50mm pipe. Easy — with one catch.
The number can be an internal or external diameter depending on the material. For copper, it’s usually internal. For PVC, it’s usually external. If the plan doesn’t say, check the legend or ask. Ordering the wrong size because you assumed is a classic trip to the hardware store.
How Water Supply and Drainage Systems Work
Before you read a diagram well, you need a rough picture of what the system is doing. Here’s the short version.
Supply system components
Water enters at the main supply line at your property boundary. It passes through a meter so you get billed for what you use, then a shut-off valve that lets you isolate the whole system for repairs. From there, the network branches out with T-junctions to reach each fixture. Vertical risers, wall chases, and concealed runs are all planned to keep pipe length short and pressure good. And in wet areas, floor drains handle surface water.
Cold water materials
Cold water lines are usually CPVC, UPVC, or PPR. They’re durable and corrosion-resistant, which is exactly what you want in a line that’s basically always full of water. If you’re working with PVC specifically, we’ve got a whole guide on DIY plumbing with PVC.
Hot water materials
Hot water pipes have to handle heat without degrading. You’ll typically see CPVC or multilayer composite on the hot side. The supply line also diverts to the water heater connection — sometimes marked “geyser” on older drawings, and feeds the hot taps from there.
Drainage design principles
Drainage runs on gravity. If the slope is right and the traps are in the right places, waste flows out without a pump. Not enough fall and you get blockages. Every waste line has a designed gradient, and the diagram shows it.
Waste separation categories
Can a toilet, shower, and sink share the same drain? Not really. Waste gets separated by type: kitchen grey water, bathroom grey water, and black water from toilets. Black water travels through its own separate, larger pipe system to the inspection chamber. The lines stay separate because they need different pipe sizes, different treatment, and different levels of care.
Grease trap
Kitchens get a grease trap near the outlet. It slows the water down, lets grease float, lets solids settle, and only sends filtered grey water to the main drainage line. Skip it and the fat you pour down the sink eventually solidifies somewhere you can’t reach. That’s how downstream blockages start.
Gully trap
The gully trap sits outside the bathroom. It’s a simple device with a water seal that blocks sewer odors and catches small debris, then routes grey water from the bathroom to the main pipeline. If you’ve ever smelled a bathroom that doesn’t have one, you understand why it exists.
Inspection chamber
The inspection chamber is your access point for checking and cleaning the sewer line. It collects multiple drainage branches and sends everything to the municipal sewer or septic tank. When you’re planning a layout, don’t bury it without marking where it is. Future you will want to find it.
How to Read a Plumbing Diagram Step by Step
Six steps, in order. Run them on every plan you touch.
Beyond tracing lines, a diagram also reveals potential problems before you cut a single pipe. Undersized pipes — for example, a Ø15mm cold water line feeding a shower and a toilet simultaneously, can cause low water pressure when both fixtures run. Improper venting, such as a missing or undersized vent stack, leads to slow drains and gurgling sounds as air pressure imbalances fight the flow. And on the drainage side, an incorrect slope, less than the standard 1:50 gradient, guarantees blockages over time because solids settle instead of washing away. Spotting these issues on paper lets you fix them before they become expensive callbacks.
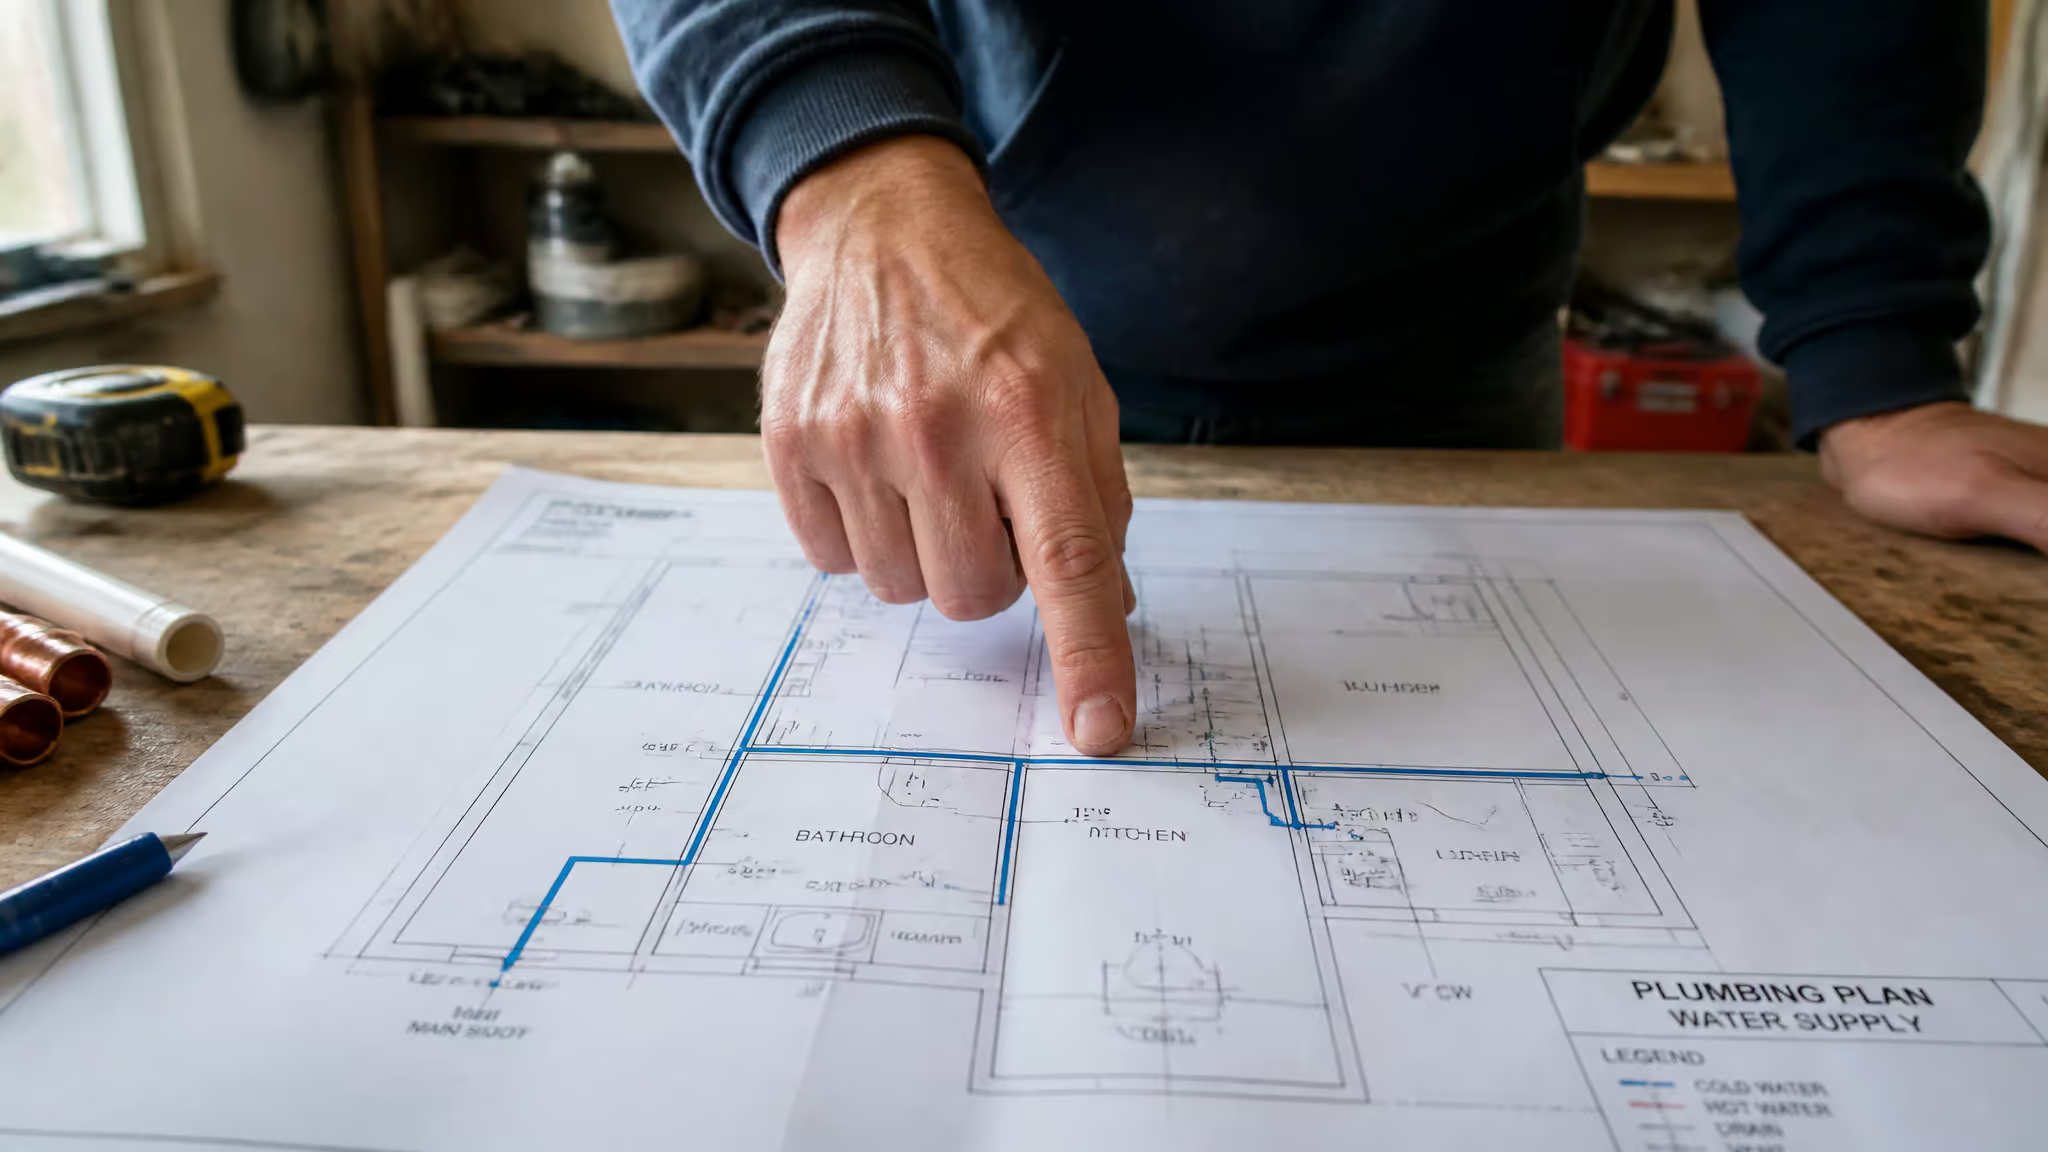
Step 1: Review the legend and scale
Start with the legend. It tells you what every symbol and line type means. Then check the scale — usually noted under the drawing or next to the title. A scale like 1:100 tells you how to translate the drawing into real distances. Skip this and you’ll misjudge everything after it.
Step 2: Identify key fixtures
Find the bathrooms, kitchen, and laundry — anywhere water’s involved. Mark every toilet, sink, shower, and appliance. You’re building a mental picture of the wet areas before you trace a single pipe.
Step 3: Trace water supply lines
Follow the pipes that bring water in. Trace cold from the meter or tank, and hot from the water heater. See where each line branches off to its fixture. The supply side is usually the easiest part because the path is logical — source to tap.
Step 4: Follow wastewater flow and slope
Now the dirty water. Waste lines should slope toward the main drain and out to the sewer or septic. Check the arrows, confirm the gradient is right, and make sure inspection openings sit where they should. This step tells you whether the drainage was designed to actually work.
Step 5: Examine venting
Vents are easy to ignore until something smells. They let sewer gases escape and keep the system’s pressure balanced so water flows freely. Trace each vent line to where it exits — usually through the roof or a vent stack. If the plan shows none, that’s a red flag.
Step 6: Check pipe sizes and materials
Every line should list a size, like Ø100mm, and sometimes a material — PVC, copper, PEX. This is how you order the right parts and stay compliant with local code. If a plan is missing sizes, ask.
Reading a Bathroom Layout: A Worked Example
Let’s make it concrete with a typical bathroom. One toilet, one vanity, one shower, one floor waste. This is as standard as residential plumbing gets.
Cold water comes in from the meter and splits three ways: to the vanity, to the shower, and to the toilet. Hot water leaves the hot water system and runs to the vanity and the shower. That’s the supply side done — two feeds, five connections, nothing complicated.
On the waste side, the shower and basin drain into the floor waste, then connect to the 100mm sewer line that carries everything out of the house. The toilet runs its own separate waste line to the same sewer connection. Every waste line slopes toward the main sewer, with inspection openings and vents placed so the system stays clear and odor-free.
If you can follow that much on a drawing, you can plan a bathroom without a professional’s help. That’s the whole skill.
Practical Tips for Reading Plumbing Plans
Four habits make reading plans dramatically easier. None of them require a course.
Use a highlighter
Grab a highlighter. Seriously. Color-code supply, waste, and fixtures on the print. A messy drawing becomes a lot easier to follow when the lines and fixtures are separated by color.
Get a scale ruler
Scale rulers are cheap and they save you from guessing. Pick up a plumbing scale ruler with 1:50, 1:100, and 1:200 scales. Because the drawing is to scale, you can measure any distance that isn’t explicitly labeled. Missing dimension? You don’t need to ask — you can find it yourself.
Talk to the builder
If something’s unclear, ask. Plans get revised during construction, and the person on site usually knows what changed and why. Standing silent because you don’t want to look dumb is how pipes end up in the wrong place. A quick question about whether a line still runs where the plan shows is normal.
Stay current with codes
Codes change. AS/NZS 3500 is the law in Australia, and US local codes plus the Uniform Plumbing Code set the standard here. What passed inspection five years ago might not pass now. Check the current rules before you commit to a layout.
Software and Tools for Plumbing Diagrams
Here’s what’s out there, from free to seriously expensive. Most of it is overkill for a bathroom reno.
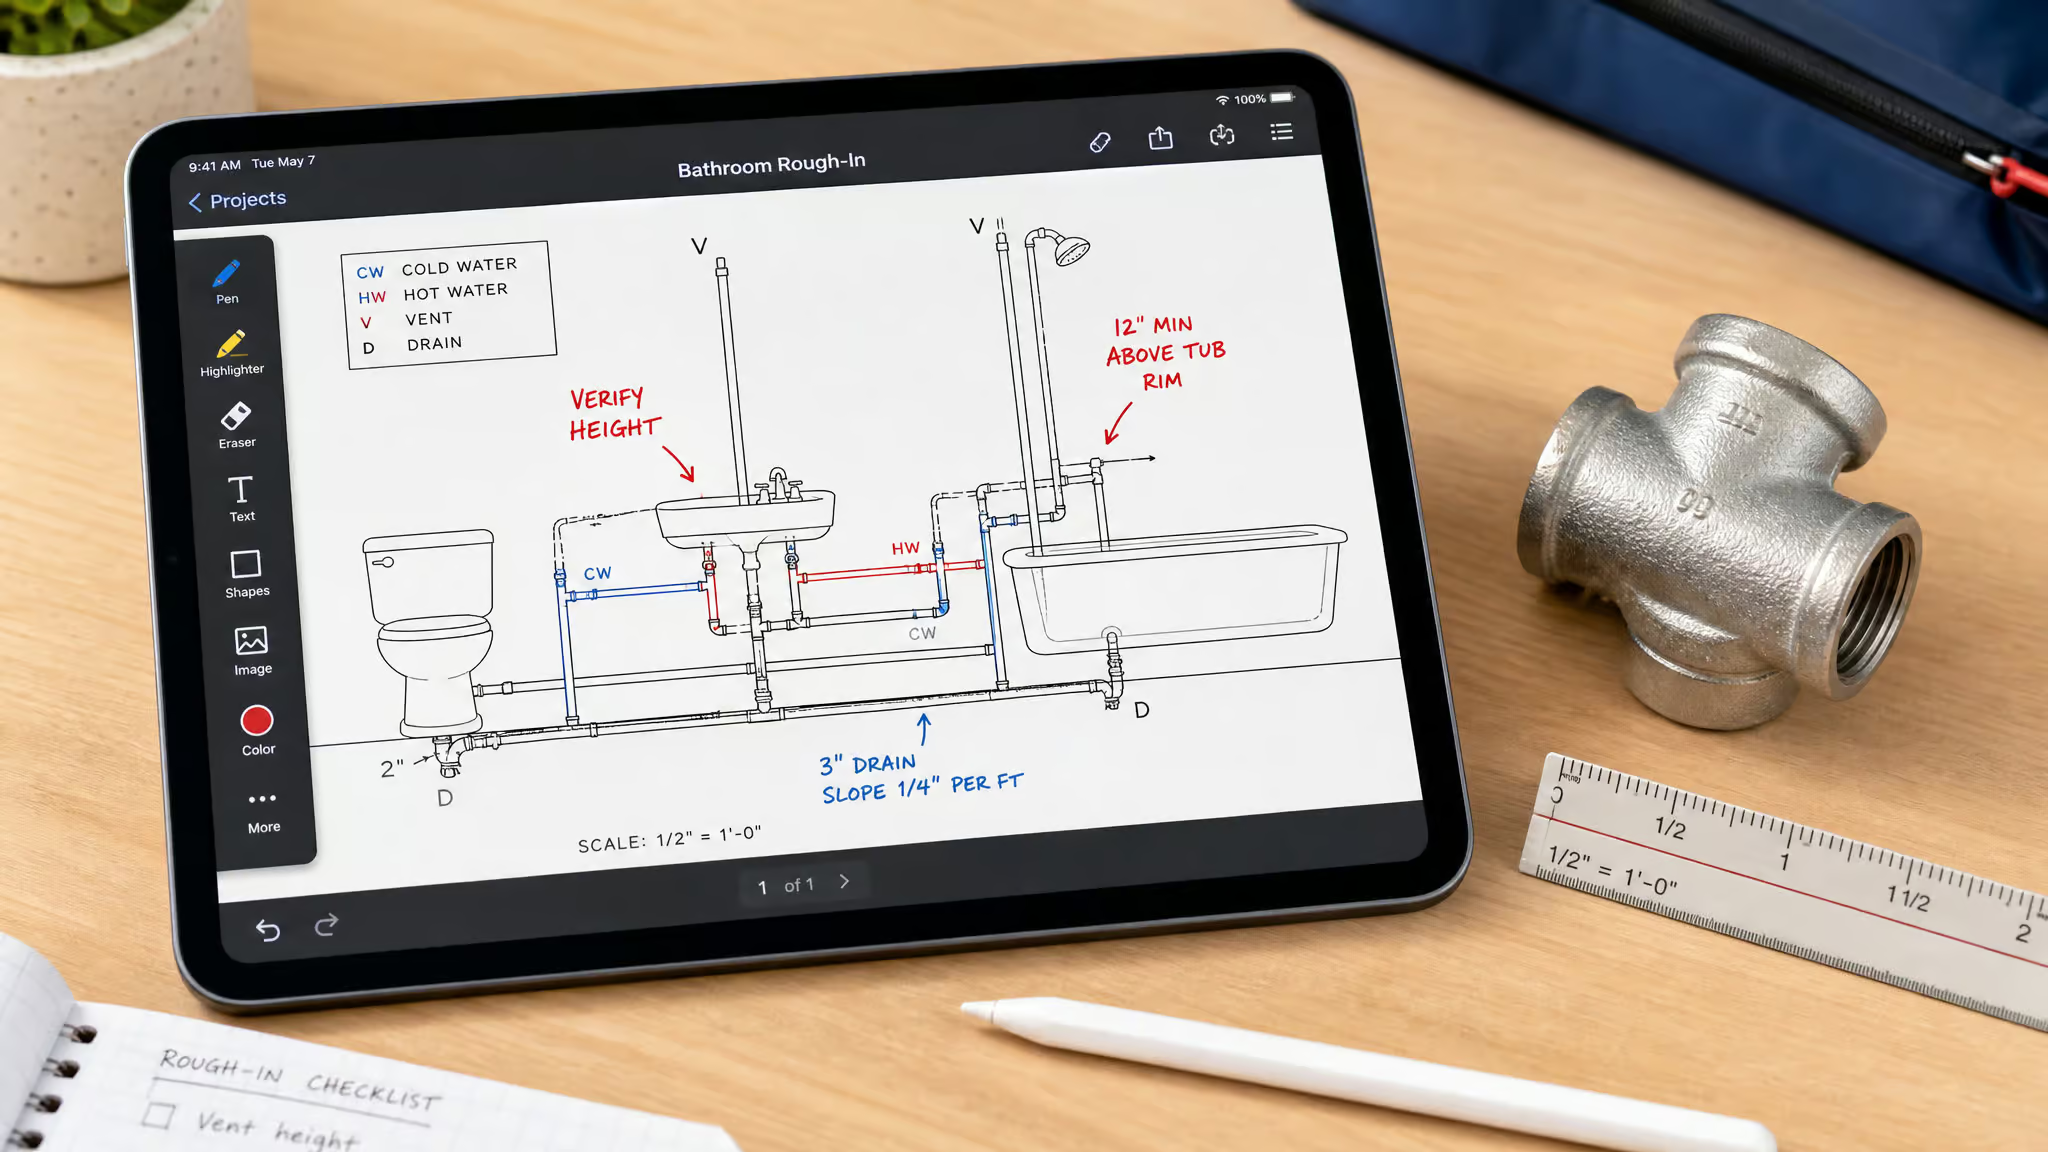
Digital plans on a tablet or phone
Most plans are digital now. You can pull drawings up on a tablet or phone on site instead of wrestling with paper rolls. Fieldwire and PlanGrid are the popular options for viewing and marking up plans where the work happens. The files you’ll receive usually come from AutoCAD or Revit, which are what architects and engineers actually use.
PlumbingCAD is the narrower tool, built specifically for plumbing and fire protection plans. And if you want to go deeper on the design side, Kaarwan runs courses and certifications.
EdrawMax
EdrawMax is a solid middle ground for DIY plans. It comes with 40 symbol libraries and more than 2,000 vector symbols — plenty for a residential layout. Full access runs $99 a year. If you’re doing more than one project, that’s not bad.
SmartDraw
SmartDraw has a massive library: 4,500+ templates and 34,000+ symbols. It starts at $9.95 per user per month, and there’s a 7-day free trial. That’s enough time to figure out whether it fits how you work.
QUICK PLUMB
QUICK PLUMB does isometric drawings, 3D rendering, and automatic pipe sizing. It’s built for people who care about the engineering side, and it saves real time if you’re doing a lot of layouts. It starts at $29 a month with a 30-day free trial — the longest test drive on this list.
PROCAD
PROCAD Plant Design Suite is the heavy option: both 3D modeling and 2D drafting, with a price to match. A one-year license starts at $1,190. There’s a 15-day free trial if you want to kick the tires, but for a single bathroom, this is like renting a crane to hang a picture.
When software is overkill
Here’s the reality check. For a small bathroom remodel, a pencil, a ruler, and graph paper get the job done. Draw your fixture layout, trace the supply and waste lines, add a legend and a scale, and you have a perfectly usable diagram. Software becomes worth it when you’re juggling multiple floors, complex drainage, or revisions that touch half the house. If your project fits on one page, start there.
How to Create Your Own DIY Plumbing Diagram
You don’t need perfect lines. You need a clear legend and measurements that are right.
Measure the existing plumbing first
Don’t draw anything until you’ve measured what’s already there. Note the location of every fixture, the pipe runs, and the connection points. This is your as-built record, and it’s the foundation for everything else. The first sketch doesn’t have to be pretty — it has to be accurate about the things that matter.
Draft with a legend, scale, and notes
Now draw it properly. Use standard symbols — don’t invent your own. Add a clear legend, directional arrows, pipe sizes, and notes about materials. Those details stop errors before they happen on site.
If you’re unsure about something, work with a plumber or engineer to get it right. You might need to collaborate with other pros to make sure the design meets code and works with what’s already there. Going it alone when you’re in doubt is how problems get built into the walls.
Update the diagram as you build
Plans get revised. Expect it. The moment you change a pipe run or move a fixture, update the diagram. When you’re done, the drawing must match reality — not the original intention. The most valuable diagram you own is the one that reflects what’s actually in your walls.
Common Mistakes When Reading or Drawing Plans
Four mistakes show up again and again in forum threads and contractor conversations. Avoid these.
Ignoring the scale
Don’t ignore the scale. It’ll bite you. Misjudge distances on the drawing and every pipe run you plan will be wrong in real life. Check the scale first, and measure with a ruler when a dimension isn’t given.
Missing fixture heights
Not every plan shows vertical placement. A floor plan tells you where things sit left to right, but not how high the pipes run or where the fixtures mount on the wall. If the drawing doesn’t show it, check the specs or ask the builder. Guessing is how you end up with a toilet that doesn’t fit.
Forgetting the drainage gradient
Drainage needs fall. Not enough slope and the pipe clogs — simple physics. The diagram usually shows the direction and gradient of the waste lines. Missing it is the kind of mistake you don’t notice until a shower backs up.
Overlooking revisions
Always confirm you’re working from the latest version, not the old set. If it says “Revision C,” don’t use “Rev A.” Old drawings get people building things twice. Check the date and version before you measure a single wall.
Blueprints vs. Plumbing Diagrams: What’s on Each Page
People use “blueprint” and “plumbing diagram” interchangeably. They’re related, but they’re not the same page.
What blueprints actually are
Blueprint is the old-school term for a 2D architectural drawing showing size, materials, and placement. And they used to be literally blue. John Herschel invented the process in 1842 using cyanotype — photosensitive chemicals and light exposure, basically photocopying before photocopying existed. That’s why they were blue. These days they’re printed from a computer, so we just call them drawings or plans.
What plumbing blueprints show — and don’t
Plumbing blueprints show the type and size of sinks, gas line locations, drains, and vents. But they’re not a complete pipe-by-pipe map. Usually you get fixture locations and main service lines, not every individual line. Complex systems need separate, more detailed drawings. In-floor radiant heating, for example, needs its own detailed plan from a head plumber — it’s not something you infer from the main blueprint.
The other pages in a blueprint set
Blueprints come as a set, and plumbing is just one part. Exterior elevations show the outside of the house at scale — ridge heights, final grade, exterior finishes, roof pitches. Kitchen and bath elevations show how cabinets and fixtures are arranged and sized on the wall, which is what you use when working with a cabinet maker on a custom layout. Electrical layouts often get their own page so they stay readable, with lights, fans, outlets, switches, and their own legend. If your house plans don’t show enough plumbing detail, that’s normal, ask for the separate plumbing drawing instead of squinting at the floor plan.
Compliance, Permits, and Knowing Your Limits
Here’s where the fun stops and the rules start. This isn’t legal advice. But here’s what the rules generally say.
The codes that govern DIY plumbing
In Australia, the rules come from the National Construction Code and the AS/NZS 3500 series. In the US, it’s the Uniform Plumbing Code, plus whatever your local jurisdiction adds. These aren’t suggestions. Your diagrams need to match local codes, and so does the work you do from them.
Follow them and you save time and avoid headaches. Ignore them and you’ll find out at inspection.
Do you need a permit?
Usually, yes, for anything beyond swapping a faucet. But this varies by location, so the only reliable move is to call your local building department before you buy materials. The one question worth asking: what plumbing work can I do myself under a homeowner permit, and what requires a licensed plumber? If you want the broader landscape first, here’s our guide to what plumbing work can be done without a license.
Cost check: Call your local building department before buying materials. Ask what you can DIY under a homeowner permit and what requires a licensed plumber — that call saves surprise fees.
When to call a licensed plumber
A simple fixture layout — toilets, sinks, showers in a small bathroom, is genuinely DIY-able if you follow the plan and the code. But there’s a clear line. Main sewer connections, gas lines, and in-floor radiant heating need a pro. That’s not a knock on your skills.
Those systems have serious consequences when they fail, and the codes treat them differently for a reason. If you’re not confident, call someone. The diagram will still be useful — you’ll understand exactly what they’re doing and why.
Start With a Simple Sketch and Verify Before You Dig
The most important diagram skill isn’t drawing talent. It’s keeping the drawing true.
Sketch your fixture layout first. Trace the supply lines and the waste lines. Add a legend, a scale, and notes about materials and sizes. Check it against local code. Then, when you change something — and you will change something, update the drawing before you pick up a tool. The as-built diagram, the one that matches reality, matters more than the original plan ever did.
Do that before you visit the hardware store. It costs nothing but twenty minutes, and it’s the difference between cutting pipe with confidence and cutting pipe blind.
Frequently Asked Questions
Can you do plumbing by yourself?
Yes, for simple fixture layouts like toilets, sinks, and showers in a small bathroom, DIY is doable if you follow the plan and local code. But main sewer connections, gas lines, and in-floor radiant heating require a licensed plumber. Check with your local building department about homeowner permits before starting.
What’s the difference between a blueprint and a plumbing diagram?
Blueprints are architectural drawings showing overall building layout, while plumbing diagrams specifically map water supply, drainage, and fixtures. Blueprints show fixture locations and main service lines, but complex systems need separate, more detailed plumbing drawings.
Do I need a permit for DIY plumbing?
Usually yes, for anything beyond swapping a faucet, but it varies by location. Call your local building department before buying materials to ask what you can do under a homeowner permit and what requires a licensed plumber. That call can save you from surprise fees.