
Ask two barbers for short haircuts for men and one reaches for a #1 guard while the other reaches for a #4. “Short” covers exposed scalp and a combable side part alike, and a thousand style photos online never tell you the actual hair length left on the head. One bad guess in the chair or at your bathroom mirror takes weeks to grow out.
Here at Unfinished Man, we map the five core short cuts (buzz cut, high and tight, crew cut, French crop, and Ivy League) directly to the clipper guard numbers that build them. Once you anchor the scale at two measured points, a #2 guard at a quarter inch and a #8 guard at a full inch, you can read any short style by its numbers instead of its nickname.
Three practical dials decide which cut fits you: how much scalp shows through, how much top length stays behind to style, and how the back and sides taper. That same number system gives men with thinning hair a real rule for keeping weight where it counts, while locking in the upkeep math of four-week recuts and 30-to-45-minute appointments.
Key Takeaways
Clipper guard numbers run inverse to hair length, anchored by the #2 guard at 6 millimeters (a quarter inch) and the #8 guard at 25 millimeters (1 full inch), with a #4 serving as the safe floor when you want zero scalp showing.
A classic short-sides, longer-top cut starts with a #6 guard all over, drops to a #4 with the lever pushed up (a 4.5), and finishes with a #3 along the perimeter. For a tighter back-and-sides taper, step down through a 3-2-1 guard sequence below the occipital ridge.
Short clipper cuts take 30 to 45 minutes in the chair with almost no daily styling product cost, but keeping the outline sharp requires a recut no more than four weeks apart.
Table of contents
Table of Contents
What counts as a short haircut for men
Five classic styles cover the short-hair spectrum, from military cuts to modern textured crops: the buzz cut, high and tight, crew cut, French crop, and Ivy League. Some clip the whole head to one near-skin length; others pair tapered sides with a combable top. In guard numbers, this range runs from a quarter-inch #2 guard up to a one-inch #8 guard on an inverse scale, lower numbers cut shorter, higher numbers leave more hair, and every working routine steps from longer guards down to shorter ones.
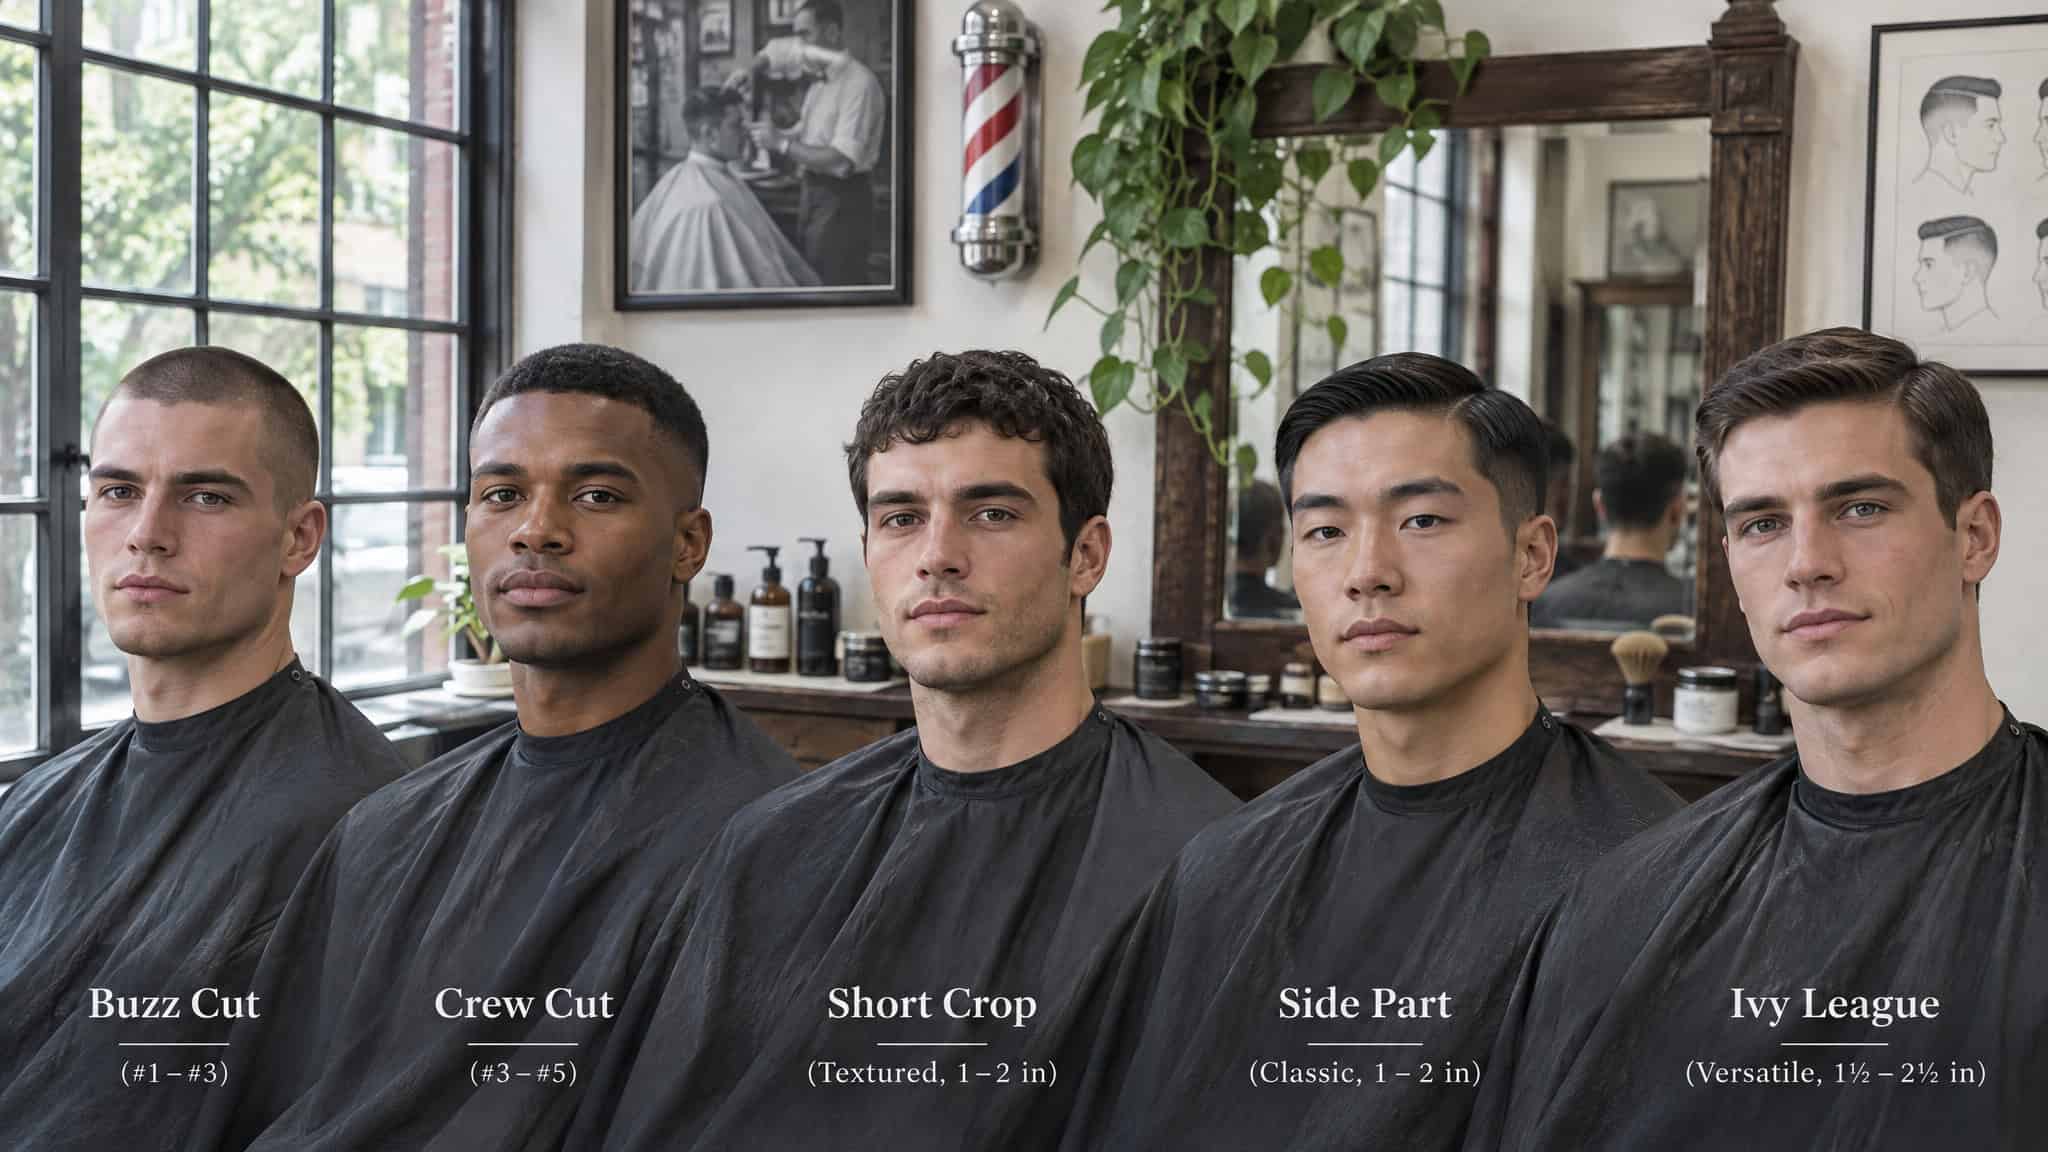
Each of the main types of haircuts for men builds its structure differently as you add length. The buzz cut is clipped to one uniform length very close to the scalp all over, while the military-inspired high and tight pairs very short top hair with a tight taper high up the back and sides. Stepping up in length, the crew cut pairs short tapered or faded sides with slightly longer hair on top, and the Ivy League (also called the Princeton) is a slightly grown-out crew cut with enough top length to comb and part neatly to the side.
The French crop keeps short tapered sides under a textured top and a short, straight-cut blunt fringe, sitting right beside the Caesar cut with its horizontal blunt fringe and the textured crop with its choppy layered top. Who suits each cut comes down to three practical dials: how much scalp shows through, how much top length remains for styling, and the shape of the taper at the back and sides.
What clipper guard numbers mean in haircuts
A clipper guard number is a length setting that runs inverse to hair length: lower numbers cut shorter and higher numbers leave more hair behind across the 1-through-8 scale. As outlined in Styles By Summer’s guard breakdown, a standard clipper guard kit covers sizes 1 through 8, typically shipping with 1, 2, 3, 4, 6, and 8 while some sets add 5 and 7.
In TheSalonGuy’s guard explainer, two measured anchors calibrate that whole kit: the #2 guard leaves 6 millimeters (a quarter of an inch) of hair, and the #8 guard leaves 25 millimeters (1 full inch), with every other number stepping incrementally between them. Across actual working haircut routines, the sizes that get used are 1, 1.5, 2, 3, 4, 4.5 (a lever setting on a #4 rather than a separate plastic attachment), 6, and 8:
- #1 guard: Cuts short enough to expose the scalp, and closes out the bottom of a 3-2-1 taper.
- #1.5 guard: A transition guard bought separately to bridge the jump between a #1 and a #2.
- #2 guard (6 mm / 1/4 inch): Leaves short hair without looking shaved, and removes heavy bulk when run downward with the grain.
- #3 guard: The main transition workhorse for blending shorter sides into a longer top, or tightening the perimeter.
- #4 guard and 4.5 lever setting: The classic stopping point for zero visible scalp; pushing the lever up on a #4 creates a 4.5 to blend down from a #6.
- #6 guard: Sets the all-over base and top length in a classic clipper cut.
- #8 guard (25 mm / 1 inch): Strips bulk quickly for a shorter, spikier side look, though TheSalonGuy notes he barely ever reaches for it, and heavy styling product in his demo mannequin’s hair kept the #8 from cutting cleanly.
Scalp visibility by guard number
If you don’t want skin showing through your hair, stop at a #4 guard. Every step shorter than a #4 exposes progressively more scalp. A #3 guard shows just slightly more scalp than a #4 while still looking clean, and you can run it only partway up the head as an easy introduction to shorter hair.
Drop to the quarter-inch #2 guard and you reach what TheSalonGuy treats as the comfort point for guys who want short-ish hair without showing a bunch of skin: a little scalp can peek through under bright overhead lighting, though not in normal light. Once you hit a #1 guard, scalp shows clearly, so skip the #1 and anything in that family unless visible skin is part of the plan.
Lever mechanics and the 1.5 transition
With no guard on the clipper, pulling the side lever fully toward you sets the blade at its shortest cut, while pushing the lever away raises the blade to leave slightly more hair. Even pushed all the way open, a bare blade cuts like a slightly longer #1 and stays very short. When you attach guards, that same lever fills the gaps between plastic sizes, which is why pushing the lever up on a #4 guard lets it cut like a 4.5. For tight fades and home haircuts, the #1.5 guard (usually bought outside the standard kit) softens the step between a #1 and a #2 so you don’t leave a hard line.
The “half” naming trap
Barbers and clipper brands use the word half for two different things. On a TPOB clipper, the lever’s longest zero setting with no guard attached is called a half, which gets worked a little way up the bottom of the neck to start a taper. A half guard, by contrast, is a separate plastic attachment you buy on its own that cuts really, really short. Confusing the lever position with the plastic guard will cost you hair.
Buzz cut: uniform length, closest to the skin
Using clippers with no guard cuts hair down to near-skin even with the lever pushed all the way open, and guards #3, #2, and #1 progressively expose the scalp, while #4 and above keep your skin covered. A buzz cut runs one uniform guard length all over the head, making it the clean pick for a guy who wants zero morning styling and accepts visible scalp on the suitability dial.
Because a buzz cut requires only one guard, beginners treat it as foolproof until the first stroke goes wrong. A guy picks up the clipper with no guard attached, or snaps on a low guard by mistake, runs one pass up the back of his head, and immediately has to buzz his entire skull to match. That exact mistake is why beginner clippers ship with color-coded guards.
In TheSalonGuy’s live demonstration, an accidental no-guard pass shaved a huge chunk far too short in one second. He called it a hair disaster, pointed to his own same-day, skin-short haircut as what a bare blade produces, and warned against going guard-free unless you want your hair looking like the over-cut demo or, as he put it, “minus skin.”
Crew cut and Ivy League: short sides, longer top
The crew cut is the default short haircut for men who want clean #4-to-#3 sides and enough top length to push around without daily fuss, while the buzz cut, French crop, and Ivy League split off by how much scalp shows and how you style the front. Choosing the best type of hair cut for men in this range comes down to how you set your three suitability dials. Styles By Summer’s classic clipper-cut tutorial shows how the crew-cut length family comes together through a 6-to-4.5-to-3 guard progression:
- Buzz cut: One uniform guard (#1 to #4) all over; zero top styling; visible scalp at #3 and below.
- Crew cut: Classic #6 top blended down via a 4.5 into a #3 perimeter; short front with finger-pushed top hair; zero scalp show at a #4 side floor.
- Ivy League: Grown-out crew-cut proportions on the sides with extra top length left behind to comb and side-part; clean, covered scalp on the sides.
- French crop: Short #3 clipped sides paired with a scissor-cut textured top pulled forward into a blunt, eyebrow-level fringe; minimal scalp show.
How the classic 6-4-3 progression works
In Styles By Summer’s classic clipper routine, the cut opens with a #6 guard run all around the head to set the base and take length off the top, followed by letting a little more side hair down so the next guard catches everything. The second pass drops to a #4 guard with the lever pushed up (cutting like a 4.5) on the back and sides. That extra fraction of length blends smoothly down from the #6 instead of leaving a step, while keeping a #4 as the floor if you want zero skin visible. Finally, a #3 guard stays strictly on the hairline and neckline to tighten the perimeter, finishing as a #6 on top blended down into a #3 at the occipital bone.
Where a crew cut turns into an Ivy League
The line between a crew cut and an Ivy League sits on top of the head. In a traditional clipper cut, the presenter trims the front shorter to keep hair out of the eyes while leaving enough top hair to play with. How much length stays on top comes down to hair type and personal preference: some hair suits longer, messier growth, while other hair behaves better short. Leave that top long enough to take a neat comb and a side part, and the crew cut crosses into an Ivy League.
High and tight: short sides on a 3-2-1 taper
The high and tight takes the military route: very short hair on top paired with a tight taper worked up the back and sides, built for guys who want a sharp outline and don’t mind visible scalp on the sides. What gives that silhouette its snap is how the back and sides step down toward the skin so the hair disappears into the neck for a neater finish.
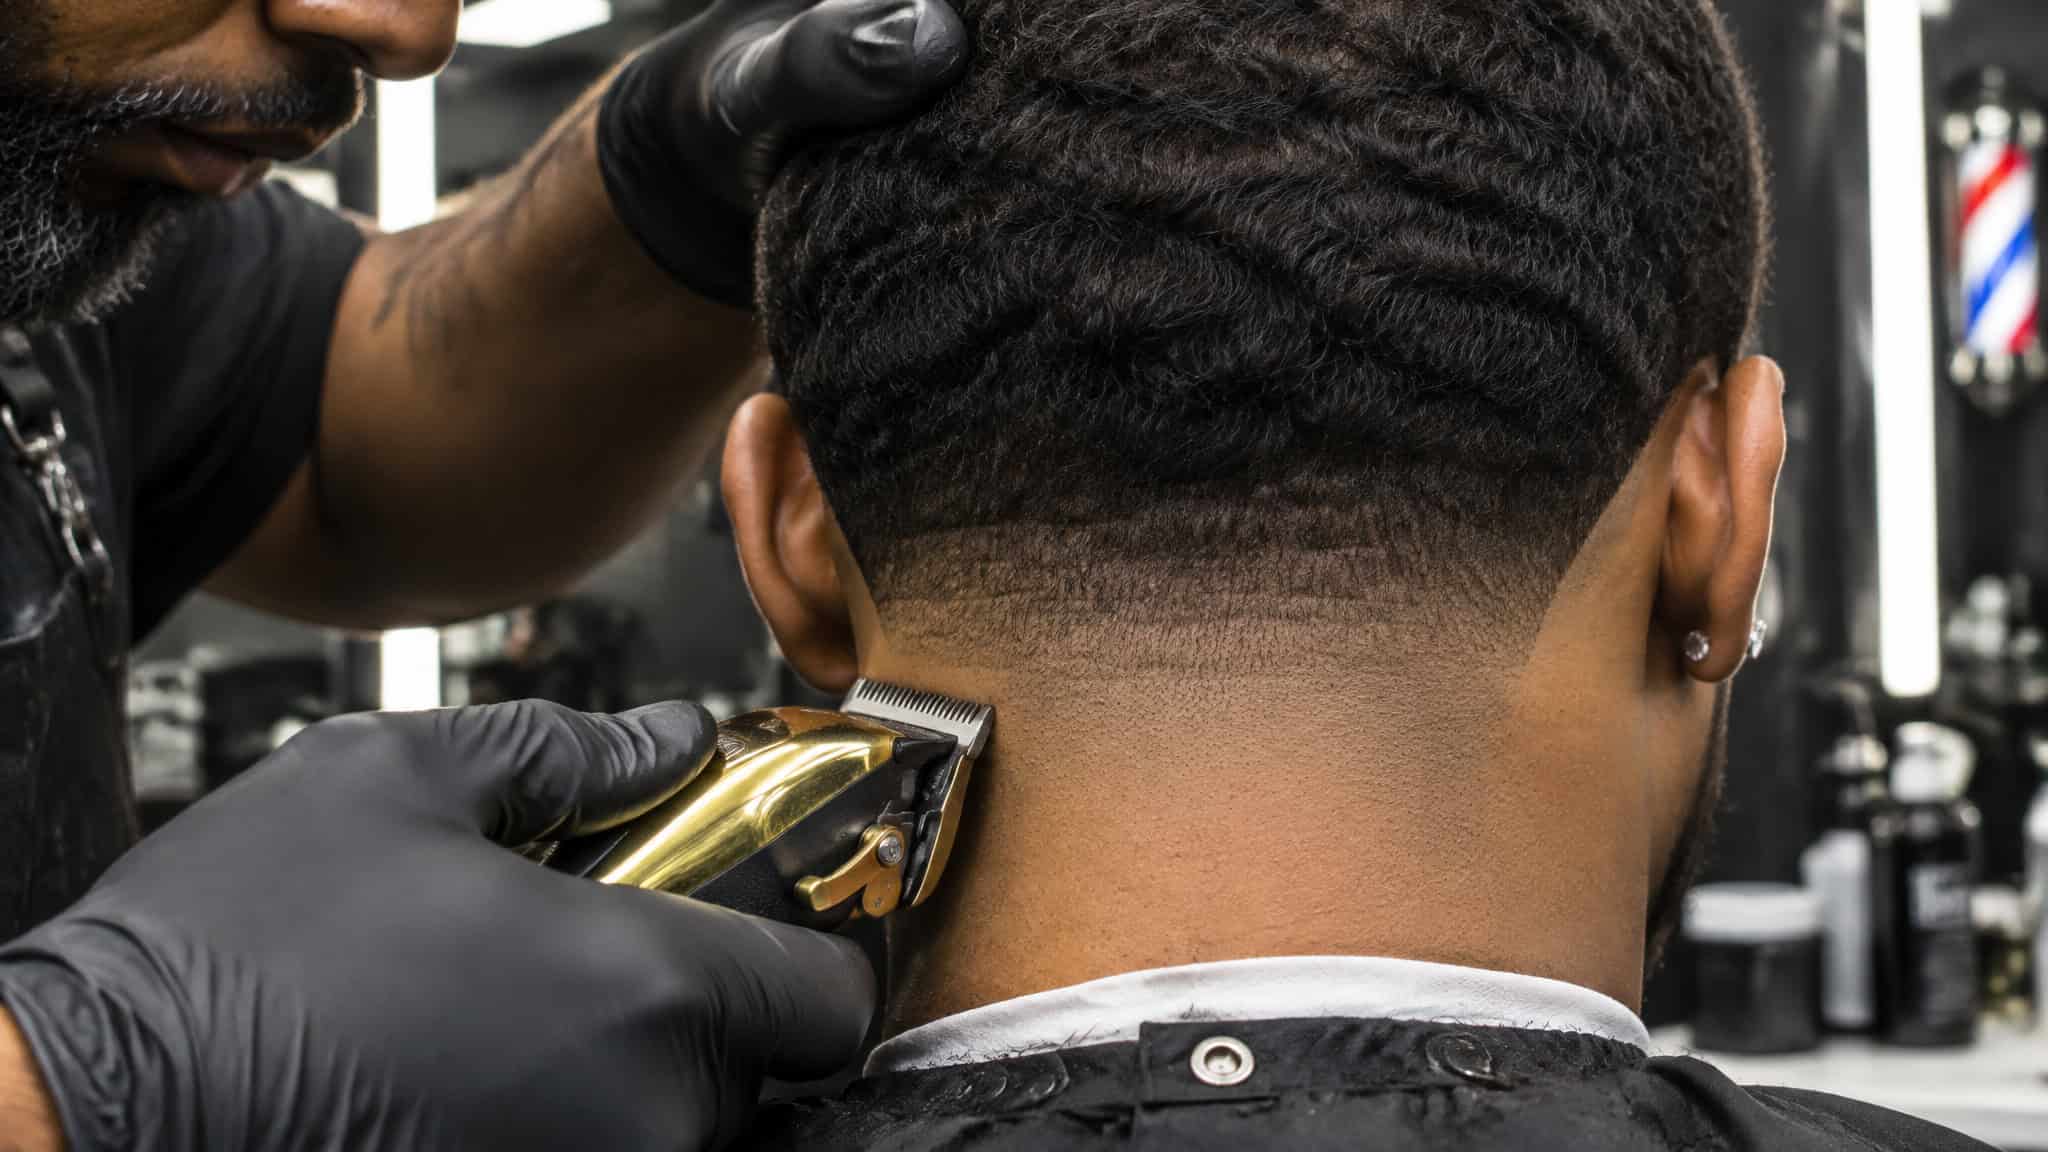
In The One Minute Barber’s beginner back-and-sides routine, that transition uses an optional 3-2-1 taper sequence. You start with a #3 guard, placing the points of the teeth right at the base of the neck and curving up and away from the skull past the occipital ridge without stopping or curving out suddenly. Next, step down to a #2 guard and run a stroke that goes in and curves out up to just below the occipital bone, stopping lower than where the #3 ended.
Finish with a #1 guard right at the bottom so the hair fades into the neck, using the TPOB clipper lever’s slightly longer zero setting (called a “half”) a little way up the bottom of the head before framing the taper with a straight bottom trimmer line. If you’re nervous with the machine, skip the 2 and 1 entirely: stopping after the #3 pass alone still leaves a clean, acceptable cut.
Taper vs fade vs uniform length on short hair
A taper, a fade, and a uniform cut differ by where the shortening starts, how the guards step down, and what job the #3 guard performs. A taper gradually shortens hair only toward the neckline and sideburns through a 3-2-1 sequence and lever work so the perimeter disappears into the neck. A fade pushes that blended gradient higher up the sides and back, low near the ears, mid at the temples, or high toward the crown. A uniform cut simply runs a single guard size all over the head.

Why the #3 guard has two different jobs
Depending on the routine, the exact same #3 guard acts as either the main side-and-back workhorse or a perimeter detailer. In The One Minute Barber’s tapered cuts, the #3 does the heavy lifting all the way up the sides and back to blend shorter hair into the top. In Styles By Summer’s classic #6-base routine, the #3 never rises above the hairline and neckline. Asking a barber for “a 3 on the sides” without naming the style invites a mismatch, so always pair the style name with the guard number.
Head landmarks and invisible blends
Two skull bulges tell you where to blend off: the occipital ridge on the occipital bone at the back of the head, and the parietal ridge along the parietal bone running from the temple around to the back. With a #3 guard, use a glide-off technique: insert the clipper, aim straight up at the ridge point, and let the blade glide straight off into the air without twisting your wrist or rounding over onto the top. When stepping down guard sizes on the back and sides, run the clippers in an angled V-shape rather than straight across so the lengths overlap, then criss-cross your passes at the bottom of the back to knock out small, dark unblended patches.
French crop: where the scissors take over
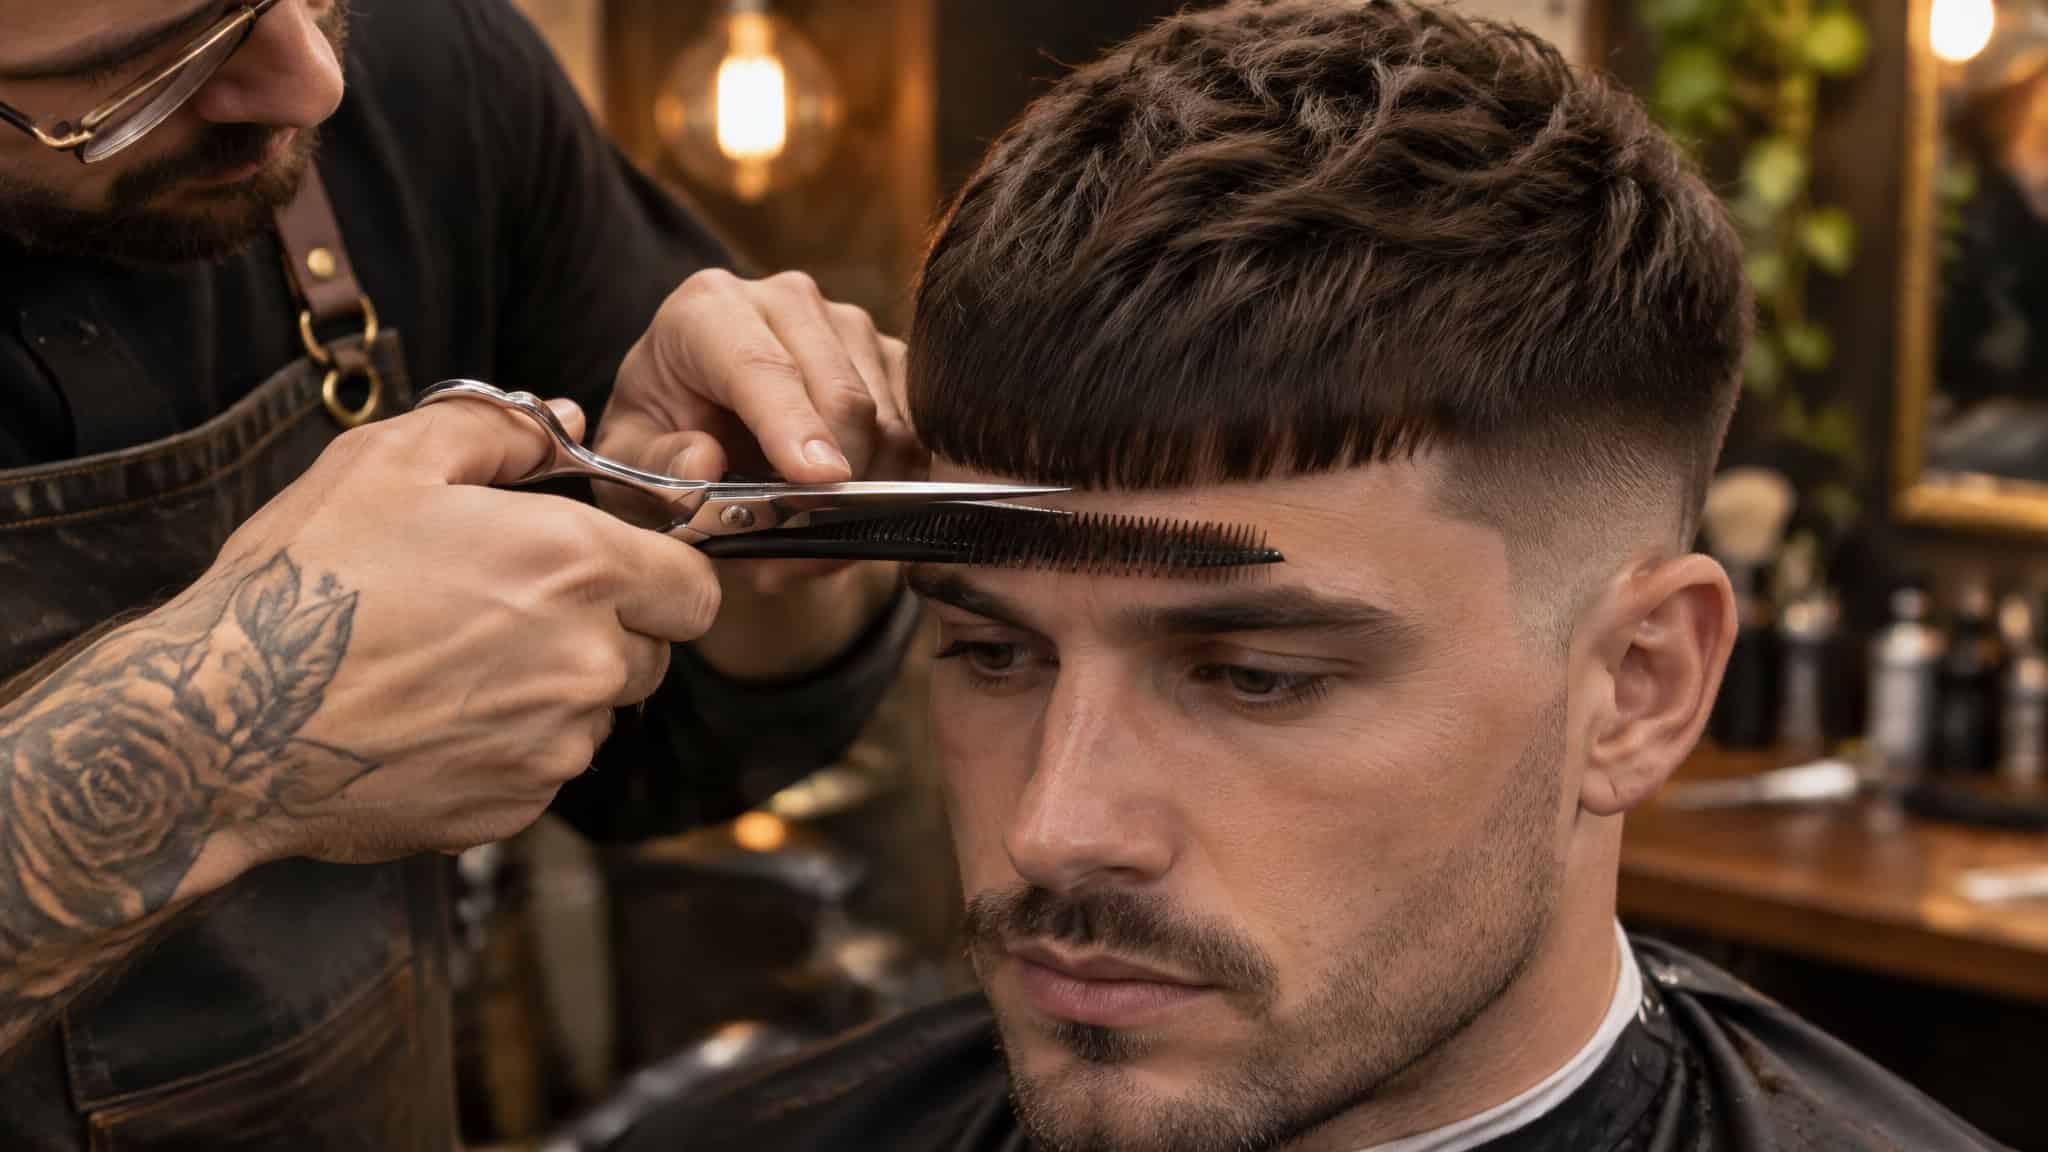
A French crop pairs short #3 clipped sides with a textured top and a blunt, straight-across fringe, fitting guys who want tidy sides and enough front hair to comb forward. You can’t build it with clippers alone because a clipper blade has a vertical reach limit up the side of the head: past that point, the guard stops cutting hair and just pushes it away, leaving an overhang that only scissors can remove.
Setting the blunt fringe
Your front hair length gets locked in while cutting the top, so finishing a French crop fringe is purely end-trimming. Comb the front hair down onto a straight comb held at roughly eyebrow level and cut straight across with scissors for clean, straight bangs.
Bridging the sides with scissor-over-comb
Before cutting the top (and to refine the blend afterward), Styles By Summer uses scissor-over-comb along the sides: comb the hair straight up, or round the comb out depending on head shape, hair type, and how severe the cut should look, and snip where the underlying hair pulls out from the root. If you’re a complete beginner, pull the section with the comb, then grab the comb with your thumb.
Lift the hair straight out, cut straight up your fingers, and keep the comb spine and the scissor’s bottom blade moving upward together as one unit. A channel member named Soul Connect Trey admitted in a comment, “I think cutting along the spine is where I’ve been messing up.
Lol,” which is the exact coordination hurdle most beginners hit before 10 to 15 repetitions make it automatic. Only dust-fine amounts of hair should come off during scissor-over-comb work, never thick clumps chewed out with a dull blade. And don’t panic if the sides look square while the top is wet: wet top hair lies flat and heavy while dry side hair sticks out, so the shape settles once dried.
The crown rule and egg-shaped profile
Always keep the point of the crown long with visible hair above your fingers to preserve bounce, body, and styling length. Cutting the crown too short alters the entire head profile. Aim for the sideways egg analogy: the chin is the pointy end of the egg and the crown is the fat end. When blow-drying, place a finger on the crown point and dry downward so the hair doesn’t spike straight up.
Working a pinch of chop dust (a dry powder texturizer) into the crown after blow-drying builds strong root lift on straight hair, though it doesn’t do much for curly hair. The finished cut balances a lifted crown, a textured scissor top, #3 sides, and simple edge cleanup.
Short haircuts and thinning hair: the scalp-visibility rule
Buzzing thinning hair down to near-skin is the default barbershop cliché, and for most guys who don’t want a gleaming scalp, it’s the wrong call. Our take is simple: treat scalp visibility and mistake forgiveness as a math problem rather than an all-or-nothing shave.
A #4 guard is the conservative stopping point when you want zero skin visible through your hair, because stepping down to a #3, #2, or #1 progressively exposes more scalp. The #3 guard is still a forgiving length that hides minor flaws, whereas every setting shorter than a #3 reveals more mistakes, and thinning hair magnifies every uneven pass. Instead of taking the top too short, use the #2 guard to manage contrast where your hair is still thick.
Run a #2 guard downward following the natural growth direction onto the heavier areas at the sides and back. That downward pass strips weight and density out of the thick zones without skinning your head, making the remaining hair on top look intentional rather than sparse.
The low-maintenance math: weeks, minutes, product
A short clipper cut stays neat with recuts no more than four weeks apart and takes 30 to 45 minutes in the barber chair depending on your hair. Compared with a traditional longer scissor haircut and blow-dry, a clipper cut is an easy in-and-out appointment that skips the wash-and-style overhead. It also carries almost no daily styling-product cost once you walk out the door.
That low-maintenance payoff holds only if you respect the calendar. A short clipper cut keeps its crisp silhouette for the first few weeks, and then the geometry starts to drift. The side blend softens, the weight builds back over the ears, and the clean perimeter along the neckline blurs. Let the gap stretch well past the four-week mark and you lose the quick 30-minute tidy-up, turning your next appointment back into a full structural rebuild.
What to ask your barber for a short cut
Never sit in the chair and ask for “short all over,” because one barber hears a #1 and another hears a #4. Give the style name, the guard number, and how high up the head the clipper should stop. Have the barber pull your hair up to show the length guide, or run your own hands through your hair to show how much top length stays behind. If you’re nervous about a guard size, ask to run the unattached plastic guard alone through dry hair first: the hair poking through the teeth shows exactly what comes off, and when in doubt, start with a longer guard and work down.
Cutting short hair at home: the beginner workflow
A beginner can cut a clean short haircut at home with hair clippers by starting with a longer guard and working downward using the #3 back-and-sides method. Once you follow three baseline rules (clipping only on clean, dry hair, snapping on color-coded guards so you never grab the wrong length, and keeping the taper simple), a home cut is fast and repeatable. Every pass relies on one core motion: insert the clipper at the bottom, go straight in and straight up to the occipital and parietal ridges, and let the blade glide off the head without bending into the skull.
The gear tradeoff: budget vs pro tools
You don’t need pro-grade equipment to cut hair in your bathroom. The One Minute Barber recommends a TPOB clipper that sits among Amazon’s best sellers: it’s inexpensive, built for home family cuts, and packs a full guard range, a tapering lever, and color-coded guards that stop you from snapping on the wrong size (his video description also notes a link for 15% off the TPOB site right above the Amazon link). By contrast, the Wahl Clipper 100th Anniversary Edition used in Styles By Summer’s classic-cut tutorial is an expensive, pro-leaning machine with metal guards and a storage case; it’s great hardware if you have the cash, but unnecessary for starting out. For scissor work on top, a sharp 6-inch pair of Japanese-steel scissors with convex-edge blades cuts cleanly without tugging hair or leaving choppy lines.
Practice drills before touching a real head
Clippers intimidate beginners (and plenty of salon stylists) because the machine removes a lot of hair at once using a different motion than long-hair cutting. To build feel for the lever and blade angle without risking your own scalp, practice on a mannequin head from Amazon first; clipper control is actually harder on a mannequin than on a human head, so nailing the pass on a dummy makes a real head feel easy. (Both tutorial mannequins started with longer hair than a typical clipper client, which leaves extra room to fix mistakes, and the cheaper Amazon mannequin had uneven, patchy density that required heavier texturizing than a real head would need, which is why that presenter prefers Pivot Point mannequins overall.) To drill scissor-over-comb coordination for free, run your scissors and comb flat up the wooden fascia boards beside a doorframe until both hands move together automatically.
The clipper pass, step by step
- Prep the hair: Clip only clean, bone-dry hair, styling product dulls blades and snags guards. If the hair was just washed, blow-dry the underneath first.
- Section the top: Lay a comb flat against the side of the head where it leaves the scalp just below the eyebrow bone, clip the top hair up out of the way, and trace that part line around to the other side.
- Run the back and sides: Start with your longest guard and step down, or use a #3 guard for a straightforward back-and-sides cut (taper at the back, straight lines on the sides). Push top hair forward or away before blending, then stroke straight up to the occipital and parietal ridges and glide off.
- Clear the front, ears, and perimeter: At the front, hold the fringe back with a comb and clip straight up to protect top length. Around the ear, hold the ear flat and tilt the clipper’s top tooth outward to follow the curve up to the temple. Keep your comb points right on the natural hairline, never inside or past it. Snip only hair that sticks out past the ear line, run a straight line across the back hairline, and comb any upward-growing neck whorl down onto the line before trimming. Bend the comb out slightly to graduate into longer side hair, and tidy any wiry, facial-hair-like side growth before adding the optional 3-2-1 neck taper.
Top scissor work and trimmer detailing
- Cut the top length: Cut a center guide strip down the middle first. From there, you can dampen the top and work forward in comb-width rectangles (combing from the root, lifting with your fingers, and pulling front sections slightly back for extra front length), or blend that center mohawk strip into the side corners with slightly angled fingers that follow the head’s curve.
- Take off the corners and texture: Pick up an imaginary vertical rectangle along each upper side corner and trim the overhang that neither the clippers nor the top pass caught. Run texturizing shears along the side seam where scissor-over-comb meets the clipper work, make one pass through the finished top, and push the hair toward each side corner to expose and point-cut into the bulk line so the hair styles left, right, or back.
- Edge with the trimmer and dry: Set a straight bottom line with a trimmer by flicking just below (never into) the natural hairline to clear neck hair, use the trimmer’s corner around the ears, define the sideburns and rounded front hairline (shown for form on the pre-trimmed demo mannequin), and blow-dry into shape.
Set your three dials before you book: decide how much scalp can show, how much top hair you want left to push around, and whether the sides need a uniform clip or a 3-2-1 taper. Turn that choice into a style name plus a guard number, keeping #4 as your floor unless visible skin is the goal. Then put your next cut on the calendar four weeks out so a quick 30-to-45-minute maintenance run never turns into a rescue job.
Frequently Asked Questions
What does 1, 2, 3, 4, 5 mean in haircuts?
Those digits refer to clipper guard attachments, which operate on an inverse scale where smaller numbers leave less hair and higher numbers leave more length. Standard kits cover sizes 1 through 8, anchored by the #2 guard at 6 millimeters (a quarter inch) and the #8 guard at 25 millimeters (one full inch). In practice, most short cuts rely on guards 1, 1.5, 2, 3, 4, 6, and 8, using the clipper’s side lever on a #4 to create a 4.5 for seamless blending.
Which clipper guard numbers expose the scalp on very short men’s haircuts?
Any attachment below a #4 guard will start showing skin, with scalp visibility increasing at every step down through #3, #2, and #1. A #4 guard is the reliable baseline if you want your scalp completely covered, whereas a #2 guard hides skin in normal rooms but lets a bit peek through under harsh overhead lights. Once you drop to a #1 guard or bare blades, visible scalp becomes a defining feature of the cut.
What happens if you use hair clippers with no guard on short hair?
Running a clipper without a plastic guard strips the hair down to near-skin instantly. Even if you push the side lever all the way open to its longest bare-blade position, it still cuts like a slightly longer #1 guard. One accidental pass with an unguarded blade leaves a bald patch that usually forces you to buzz your entire head to match.
What is the difference between a fade and a taper on men’s short hair?
The difference comes down to how high up the head the blending starts. A taper gradually shortens the hair only around the neckline and sideburns—often stepping down through a 3-2-1 guard sequence—so the edges melt cleanly into the skin. A fade takes that same blended transition and pushes it much higher up the back and sides, wrapping around the ears, temples, or crown.
Is a clipper cut faster and cheaper than a regular barber haircut?
Yes, a short clipper cut takes just 30 to 45 minutes in the chair because it skips the wash-and-blow-dry routine required for longer scissor work. You also spend almost nothing on daily styling products once you leave the shop. The only catch is keeping up with four-week maintenance appointments so the shape doesn’t grow out.
Why does the #3 guard give different results depending on what you tell your barber?
Barbers use the #3 guard for two completely different jobs depending on the routine. In a tapered back-and-sides cut, the #3 does the heavy lifting all the way up to the ridge of the skull, whereas in a classic #6-base cut, the #3 only touches the bottom hairline and neckline to tighten the edges. Always pair your guard number with a specific style name so you and your barber are on the same page.